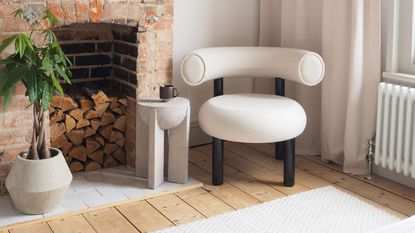
This unbelievable IKEA hack sees a bamboo fruit bowl turned into a designer-inspired side table
Find out how this DIY guru turned a classic $25 IKEA fruit bowl into a stylish table with the help of a few power tools


If you're an IKEA fan, you'll undoubtedly recognize the Blanda serving bowl. It's a top-seller and a bit of an IKEA classic, after all.
'Hasn't everyone owned one of these fruit bowls at some point in their life?' asks interior stylist and Livingetc contributor Luke Arthur Wells. But, after renovating his kitchen, and left with an old Blanda he no longer wanted, he saw the potential to upcycle this bamboo bowl into something a little bit different.
With his trusty power tools and some DIY tricks and tips up his sleeve, he set about on an unusual IKEA hack, transforming the fruit bowl into a stone-effect side table.
Here, Luke Arthur Wells shows Livingetc the process and shares his top advice if you're considering trying this project for yourself.
Before and after - how to hack an IKEA blanda bowl into a side table


1. Cut a lid for the top of the table

Start by drawing around the bowl on a piece of MDF. Cut out with a jigsaw. However, you won't be sticking this down yet.
2. Make the legs


You want suitably thick legs for your table, so consider sticking to pieces of MDF together with adhesive. Once dry, draw around the edge of the bowl and cut this line out with the jigsaw too.
Sand the edges with a mouse sander for a more rounded, organic finish.
3. Fix the legs to the table top

Drill eight holes in a cross across the Blanda bowl with a thin drillbit. Turn the bowl over, and on the inside, drive a screw through into the top of the legs with an electric screwdriver. Complete this across all the legs.
To make the legs super secure, apply an expanding glue before attaching the screws.
4. Plaster the table with skim


Apply a skimming plaster over the table and allow to dry. It doesn't need to be very neat, as you'll be sanding it after.
Using a mouse sander or sandpaper, sand down the high peaks on the skimming plaster for a smoother finish. If there are any large holes, reapply plaster as required.
6. Paint with a stone-effect paint

This table is painted with a stone-effect paint with a little grit in it to create texture, using a paint brush. Give two coats, and then use a clear, matt sealer over the top for a more durable finish.
Be The First To Know
The Livingetc newsletter is your shortcut to the now and the next in home design. Subscribe today to receive a stunning free 200-page book of the best homes from around the world.

Hugh is the Editor of Livingetc.com. From working on a number of home, design and property publications and websites, including Grand Designs, ICON and specialist kitchen and bathroom magazines, Hugh has developed a passion for modern architecture, impactful interiors and green homes. Whether moonlighting as an interior decorator for private clients or renovating the Victorian terrace in Essex where he lives (DIYing as much of the work as possible), you’ll find that Hugh has an overarching fondness for luxurious minimalism, abstract shapes and all things beige. He’s just finished a kitchen and garden renovation, and has eyes set on a bathroom makeover for 2024.
-
 How to Thaw a Frozen Pipe — Learn Everything You Need to Know in 5 Minutes With This Guide
Winter storm caught you off guard? We asked an expert — just how do you thaw a frozen pipe?
By Hugh Metcalf Published
-
 The 12 Very Best Silk Bedding Pieces — As Our Style Editor Says: 'It's What Dreams Are Made Of!'
Slumber in lustrous luxury with the very best silk bedding sheets, duvets, pillowcases, and more — your sleep score will thank us later
By Julia Demer Published

