DIY kitchen countertop ideas – 10 ways to give your kitchen an easy update
Be inspired by these DIY kitchen countertop ideas, and give your space an easy update with paint, tiles, vinyl and more


DIY kitchen countertops may not sound like the most straightforward project, and sure if you are up for a challenge there are some gorgeous (but time-consuming) looks you can recreate yourself. However, there are also plenty of easy ideas you could do you give your countertops a new lease of life.
Let's face it, kitchens take the maximum hit in the house. Used every day, they're exposed to spills, stains, and sometimes even fire. While cleaning up a mess with a damp cloth may resolve the issue temporarily, some marks and ingredients go deep into the pores of the countertop and make a home there. Over time, the material starts wearing and tearing, and the heart of your home starts to look a little less shiny. Were you regularly sealing the counters? Were you getting it professionally cleaned? Perhaps not, and it will start to show.
The good news is, you can give the counters a new lease of life, on a budget, all by yourself. From painting, varnishing to laminating, DIY kitchen countertops ideas are aplenty. All you have to do is decide which solution is right for you.
1. Consider kitchen countertop materials and style

There are a few rules to keep in mind before you choose to change your countertop. Have a clear idea of the color and design of the counter you need, its thickness and length, how durable it is, and the total cost – that means, the cost of buying it and maintaining it as well.
The world of kitchen countertops is vast. You can choose from laminate (if you want a wide selection of colors and patterns at your disposal), tiles (for a unique look and affordability), quartz (for impact resistance and durability), terrazzo (for its similarity to marble yet stronger make), wood (for its warmth and high-quality finish), concrete (for its distinct industrial look and strength) and many more. William Durrant, owner Herringbone Kitchens, avers, 'Kitchen worktops are one of the most important decisions you’ll ever make when it comes to your kitchen design (and one of the hardest). A worktop choice completely depends on how you live and how you use the space; however, we would say the most popular worktops currently being requested are Quartz, Dekton and Granite because of their durability and they look great too. Quartz worktops are a popular choice as they are beautiful, practical and require less maintenance than other materials. Dekton is an ultracompact surface which is extremely hard wearing - scratch, stain and heat resistant. It is available in a range of finishes, some similar to natural stone and some more industrial styles that imitate cement or concrete worktops. Granite is a natural stone similar to marble, with the advantage of being highly scratch, stain and heat resistant when properly sealed.'
interior architect, Cormac Lynch further adds, 'I normally use a Ceaser Stone for kitchen countertops. This product comes in multiple colors with all sorts of marble vein patterns. I also love to use machine-made or hand-made glazed tiles, sometimes in assorted colors and I like to extend them onto the splashback too.'
'Furthermore, I like to get creative with the layout of the patterns e.g. I like to place rectangular tiles in a vertical manner, one placed on top of the other, as that can look wonderful and unique. Also, I like to use colored grout e.g. red grout can look very stylish with black glazed tiles.'
'Cost-effective options can help you achieve a wonderful look – it is all about how they are laid out. Large format terrazzo, with a beige colored background, looks great. I think this can add interest to any kitchen counter, and can refresh and create an individual, bespoke look.'
2. Things to keep in mind with DIY kitchen countertops

In the beautifully large and sumptuous world of kitchen countertops, it can be difficult to choose the best ones for you. If you're in the middle of remodeling a kitchen and are planning on DIYing it or are interested in giving counters a specific look then keep a few things in mind.
Most kitchen DIY projects feature wood and concrete, while epoxy and recycled glass are used too. In any case, the cost depends on the type of materials you’re using. For any material to be DIY-friendly, it must be readily available, easy and inexpensive to transport to your home, and easy to work with using standard tools.
Of course, keeping this in mind, all-natural stone and quartz slabs don't entirely meet the criteria because they're heavy, not very easy to cut, or even lift. 'Homeowners today have multiple choices and a variety of colors and options. We love the use of white laminate countertops in our projects to bring in the large airy and bright look to the kitchens. We also like the use of softer neutral tones like beige and grey that bring in a hint of color and warmth to a kitchen,' Vinithra Amarnathan, founder, Weespacessays.
3. Opt for chic and affordable laminate

There are loads of colors to choose from when it comes to laminating the count and it's the perfect material for a minimalist, modern kitchen. The most economical thing to do is to install new laminates on old countertop surfaces.
DIY IT: For this, you should thoroughly sand and clean the surface to remove all debris and contaminants. You then need to measure the dimensions of the countertop and draw a diagram of the countertop shape. This will help you to cut the sheet laminate. Remember, while measuring also take into account the edges so your sheets need to be cut perhaps an extra inch longer. Use a special blade, like a utility knife to cut the sheet laminate. Now, it's time to paste.
Plastic laminates can be applied with contact cement, that needs to be brushed on top of the countertop surface. After applying a smooth, even layer, use the same to slather on the backside of the laminate cut out. Allow the adhesive to dry (check the contact cement label for recommendations). Now place strips of wood on the countertop, roughly one foot apart. These strips act as barriers between the sheet and existing countertop – and don't worry, they won't stick. Now gently place the sheet on top of the wooden strip.
Now remove the first wooden strip or dowel and use a J-roller to push the sheet down, on the counter. Use the roller to apply pressure to the sheet so there are no air bubbles. Press down and trim whatever bits are extra.
4. Add an overlay for an industrial DIY countertop

For industrial kitchen ideas, try the magic of overlays. This is cheaper than bringing in brand new solid quartz or concrete worktop. All you need to do is to ensure your counter is strong, stable, and overlaying directly on top won't break it. If you’re using a concrete dye, don’t worry about the slabs not matching perfectly. Slight variations give the counter a unique look.
DIY IT: Before you start the work, tape up the doorways and handles in the kitchen with plastic tapes or a cloth. The DIY process will create a mound of dust and you don't want to spend hours cleaning up. Take a damp cloth and wipe the countertop and even the kitchen splashback. Sand the countertop and wipe away all the dust. Make your first batch of concrete mix – check the container instructions on how to make this. Ideally, your mix should have a pancake batter-like consistency. Mix it using a drill (set on low).
Now let it sit for five minutes so all the bubbles rise. Once it has settled, coat a thin layer onto your countertop. Now let it dry – this could take up to two hours. Once the layer is dry, sand it so it's completely even. Now you can add another coat of concrete, depending on how thick you want the countertop to be.
Keep sanding it so the surface is always even. Once you have the thickness you like, and once the concrete is dry, seal it with a professional market sealer.
5. Experiment with self-adhesive sheets

For a quick and effective kitchen idea, try contact paper as these can mimic the look of marble, granite, or wood. These are available in rolls, with a waterproof side and a sticky backing covered with a protective film. They are like stickers for surfaces – they can even be stuck inside drawers and cabinets.
DIY IT: Scrub the countertop to make it ready for the DIY and let it dry. Lay the paper on the surface of the countertop and trim the extra edges. Start with the back corner and leave a little overhang so you can fit the film in precisely; trim the extra bits. Peel the paper backing and press it down on the counter. Run a smoothing tool over the surface, and push out the air bubbles. Wherever you see extra edges, just use a utility knife and remove the folds.
6. Paint a countertop (with caution)

Ideally, painting works best with wooden kitchen countertops as wood can soak in the color and once sealed, can give the counter a fresh, bright new look for a long time. Laminate surfaces can be painted too, but they need to be prepped properly, and you need to use acrylic paints. And while you're at it, why don't you try to paint kitchen cabinets as well.
DIY IT: Sand the surface of the counter – 150-grit sandpaper should be fine. Thoroughly wipe the counter off dust and debris with a slightly damp cloth and let it dry. Take a paint roller and apply a thin, even coat of primer. Check the drying instructions on the box. Wait for the primer to dry completely and then apply the second coat.
Once the surface is ready, start blending in the paint, allowing adequate drying time between layers. Apply the first coat evenly, let it dry and then give it a second coat. Once dry, it's time to seal it. Carefully pour the resin over the painted surface and make sure it's distributed evenly. If you see any bubbles popping up, make sure you pop them by aiming a blowtorch at them, holding them a few inches away.
7. Wrap with metal sheets

If you love the industrial look, then a metal-wrapped countertop is just the thing for you. Hammered copper especially looks fabulous. 'Copper is shiny and has an incredibly fluid, ever-changing patina. What a special product it has turned out to be, so glamorously chic and a little bohemian. Who would have believed that one material could have so many benefits and also be so good looking – some worktops have all the luck!' says Helen Parker, Creative Director at deVOL. If you're installing a copper sheet, consider adding a copper sink too, to your kitchen for a unified look.
DIY IT: Measure the countertop, note down the dimensions, and order the sheet metal pre-cut from the manufacturer. Brands can provide you with a custom measure, exact to your requirements.
Usually, the sheet that is provided is pre-polished, buffed, and ready to be installed. These are usually installed like laminates or tiles; you essentially need contact cement or epoxy glue to be rolled on the countertop. Press the sheet of metal into place and use a roller to fully press the sheet down. Push out all the air bubbles and make sure the metal layer is applied to every corner and edge of the surface.
Usually, if you leave a metal sheet to dry on its own, it doesn't really stick unless it has been weighed down. Sandbags or heavy boxes can do the deed. Anything over 25 pounds is ideal. These should be placed evenly across the surface to distribute the weight.
8. Embrace the trend for tiled countertops

Tiled kitchen countertops had their heydays, but lost their significance over the years. But lately, tiled kitchens and countertops are seeing a resurgence, and becoming quite the thing in interior design trends.
Tiling the countertop is a good DIY idea if your counter is beyond repair. You can simply place the new tiles over the old ones and give the kitchen the lift it deserves.
DIY it: Measure the countertop and determine how many tiles you need, and their correct size. Also account for grout when planning your tile size.
Next, turn off the water supply, unscrew the sink, and disconnect the plumbing. You need to invest in a tile cutter; you can even get a wet saw, available for rent at most home stores. For fine-tuning tile cuts, tile nippers are great as they help contour the tile.
For ideal tile and grout color combinations, think whether you want your tiles to stand out or simply blend in with the entire surface. You could even buy some grout samples and test them out with a few tiles. Keep in mind the width of the grout lines – the wider it is, the more contrasting the look of the surface.
Before you install the tiles, you will need to create a flat, moisture-resistant surface to support the tiles. You can use a cement lining layered with plywood. Now apply a thin-set adhesive mortar across the surface. Remember, because the adhesive dries quickly, apply it in small sections and immediately set the tiles. You may have to wiggle the tiles in slightly as you press down to make sure they're in position.
Use spacers to create even gaps for the grout. Once the tiles are set and dry, ideally wait a day before you start the grouting. Mix the grout as per the manufacturer's instructions and carefully remove the spacers from between the tiles. Push the grout in between the tiles. It will take about 3-4 days for the grout to cure, post which you must apply the sealer to save the countertop from stains.
9. Extend the countertop

This is the easiest, sneakiest DIY out there because it requires no real muscle work. If you have a tiny kitchen and want to increase its functionality, you can simply extend the countertop with an extra small kitchen island – or even a movable trolley. This will not only increase your workspace but also help diversify the materiality of the space.
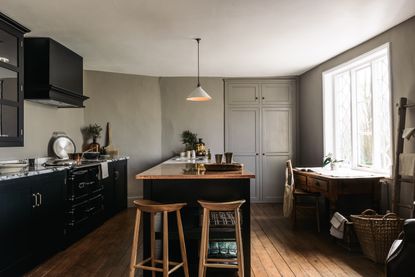
In this image, the black-toned laminate is complemented with a wooden counter. The colors create a beautiful contrast, add to the vibrant visual and help the homeowners enjoy the best of both worlds.
Another idea is of a foldaway counter, that is attached to the original counter and that can be hidden away when not in use. These work especially well in typical small galley kitchens in modern apartments.
10. Consider varnishing the existing one

When faced with a big task, always choose the smarter (and cheaper) route! Now that may not apply to everything in life but for some home reno projects, it does. If the space features a wooden kitchen worktop, a brand new, fresh coat of varnish could instantly lift the look of the space. Choose acrylic varnishes as these are water-based and water-resistant – its hardwearing finish is ideal for a frequently used countertop. Another option is an oil-based varnish which absorbs into the wood but changes its tone a bit, making it look darker. If the change in hue is not a concern for you, then an oil-based one will work just fine.
DIY IT: Scrub the countertop with a warm, soapy mixture or a homemade cleaner to get rid of all the dirt and dust. If the counter has any fixtures or handles, those should be either removed or covered, unless, of course, you don't mind changing their colors too. Wait for the surface to dry completely, and now open the varnish box.
Stir it gently but slowly so no bubbles are formed. Now apply the varnish with a natural-bristle brush that is as thick as its handle. Make sure you cover every surface evenly. Check the sides and edges for an even coat. Remember, when applying the coat, work with a light touch. Ensure only the tip of your brush is bending on the surface. Start with a one-square-foot area, and always apply the varnish in the direction of the wood grain. Leave it to dry.
What is the easiest countertop to install?
The answer to this truly depends on your skills as a DIYer. For some, big craftsmanship projects truly satisfy. Most others look for quick, easy-to-install solutions. Largely, the easiest countertop material to tackle as a DIY project is the stick-on laminates. These are waterproof, durable, easy to clean, and cheap. Installing tiles or concrete blocks take a lot of time and requires constant maintenance. These blocks also need to be sealed often.
How can I cover my countertop without replacing it?
There are several ways to do this. You could choose to paint the kitchen countertop – this especially works with wooden counters. If you’re covering laminate with paint then you'll have to look for a specialist paint that is tintable. Even acrylic interior paints are useful. The other option is peel-and-stick counter sheets that can mimic the look of marble, wood, or even concrete. These are great for renters as the sheets can be peeled off, and quite practically speaking, they don't last a lifetime, and so are great temporary solutions.
Contact paper or temporary wallpaper come in realistic faux-marble veining and bold colors. Plaids and polka dots too are available options to beautify the counter. For the super dedicated DIYers, there's always the option of adding brand new tiles. You can tile over an old and worn-out laminate.
Be The First To Know
The Livingetc newsletter is your shortcut to the now and the next in home design. Subscribe today to receive a stunning free 200-page book of the best homes from around the world.
Aditi Sharma Maheshwari is an architecture and design journalist with over 10 years of experience. She's worked at some of the leading media houses in India such as Elle Decor, Houzz and Architectural Digest (Condé Nast). Till recently, she was a freelance writer for publications such as Architectural Digest US, House Beautiful, Stir World, Beautiful Homes India among others. In her spare time, she volunteers at animal shelters and other rescue organizations.
-
 The 12 Best Table Lamps for Reading —I'm a Certified Bookworm (and Shopping Expert)
When it comes to table lamps for reading, I don't mess around. If you're the same, this edit is for YOU (and your books, or course — and good recommendations?)
By Brigid Kennedy Published
-
 "It's Scandi Meets Californian-Cool" — The New Anthro Collab With Katie Hodges Hits Just the Right Style Note
The LA-based interior designer merges coastal cool with Scandinavian simplicity for a delightfully lived-in collection of elevated home furnishings
By Julia Demer Published

