How do you fix paint drips? 4 steps to rescue your walls (and how to avoid the problem in the first place)
Experts explain how to fix paint drips, so that you can remedy any basic DIY errors (don't worry, we've all been there)

It's all too easy to be a little heavy-handed when painting a room, so knowing how to fix paint drips that might occur is key to getting the best finish possible.
Drips can be a problem when your paint is runny or thin, or too thickly or unevenly applied, but luckily, there are a number of tips and tricks to fix paint drips if you've encountered this problem.
The best course of action? Learn how to avoid drips when decorating your walls (we've got the paint ideas and advice to help you avoid that, too), but where you do find yourself with a less-than-perfect finish, here's how to resolve the issue.
How to fix paint drips for a flawless finish
1. Sand small paint drips away
If the drip is small and shallow then you may well be able to sand it away.
'Try a fine to medium sandpaper and see how you get on,' the experts at paint brand Frenchic suggest. There's a trick to stop you rubbing away too much of your painted surface, too. 'Keeping the direction of sanding along the length of the drip rather than across it will minimize the effect on surrounding paint.'

2. Use a scraper blade for larger paint drips
For larger or more stubborn drips, a clean scraper blade, or similar, should do the trick.
'Remove as much of the drip as you can and then smooth out any remnants with sandpaper – again following the length of the blemish as above,' the experts tell us. 'If the paint is still a little tacky underneath, you may find it easier if you allow more time for it to dry before sanding.'
3. Assess whether filler is needed
If you find that the process of removing dried drips has resulted in deep scuffs and scrapes then you may need to use a filler to level up the surface.
Choose a filler that is appropriate to the surface you have painted (or a multipurpose product).
'Prepare the area by sanding to smooth before applying as per its instructions. Sand again lightly once dried and paint over,' our paint experts explain.
Of course, if you're trying to remove drips from something other than walls, consult our guides on how to paint furniture or how to paint kitchen cabinets, for example. You'll want to use a wood filler over a standard masonry filler for this job.
4. Paint over it
'You will need to touch in the area you have sanded,' advise these paint experts. 'Try to do this in the same way as it was originally painted to minimize the chance of the surface texture appearing different (which will draw attention). So brush or roll as appropriate and don’t forget to remove any sanding dust with a clean, slightly damp cloth first.'

How to avoid paint drips in the first place
Learn how to paint a room properly, and with a little effort and vigilance, you will save yourself time and inconvenience later.
1. Stir your paint thoroughly
As basic as it sounds, a really good stir will make all the difference; shaking the tin is not anywhere near as effective.
'Paint can settle over time, making it thinner at the top of the tin,' the paint experts at Frenchic explain. 'Using a wide implement is best to make sure you incorporate all the ingredients, right down to the bottom of the tin.'
There are some good stirrers available if you don’t want to mess up your best ruler, and you should also figure out how to pour paint without drips.

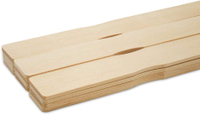
Box of 25 Hardwood Paint Stirrers, $13.19, Amazon
A box of paint stirrers is a much-overlooked essential for your DIY kit. These wooden ones are budget-friendly and still reuseable.
2. Use dry brushes and rollers
Rinsed-out equipment can retain a surprising amount of moisture, so while it may be tempting to dive right in to paint a room fast, it could cost you time in the end. If you use damp tools, the moisture can result in thinned paint, leading to drips.
'Rollers are particularly notorious for this, so squeeze them out really thoroughly before leaving to dry – and check before reusing,' Frenchic's experts explain.
'Leave brushes flat or with bristles hanging down if possible while they dry to prevent water being trapped in the metal ferrule.'

3. Size matters
'Using a brush or roller that is too big can result in excess paint collecting on or around edges and in recesses, leading to drips, especially for things like spindles, beading/paneling and where walls meet woodwork,' warns Frenchic.
'Always cut-in with a suitable sized brush around the edges of areas you will be rolling.'
4. Less is more
'Another top tip is to avoid overloading your brush or roller with paint and then trying to stretch it out,' say the experts at Frenchic.
'This tends to lead to uneven coverage, which can mean drips form on walls and builds up around detailed areas.
'Use your brush to smooth out paint that builds up on edges and ledges, before it can form drips. Start in corners and smooth away from there. Keep pressure light and even, using longer strokes.'

5. Be vigilant
Try to get in the habit of checking edges and ledges (and around corners) as you go because it is easiest to smooth out a drip before it has started to dry.
Frenchic says: 'If, despite your best efforts, you spot that drips have appeared and you can’t smooth them with a brush because they have dried, all is not lost. You can deal with them successfully with the right approach later on.'
6. Avoid the tacky problem
'Trying to brush out a drip once the paint surface has started to dry will not work and can make a small problem much bigger by spreading the partially dried paint,' says Frenchic.
'Leave it to dry completely – and remember this may take longer than usual as the paint is thicker.'
Be The First To Know
The Livingetc newsletter is your shortcut to the now and the next in home design. Subscribe today to receive a stunning free 200-page book of the best homes from around the world.
Ruth Doherty is a lifestyle journalist based in London. An experienced freelance digital writer and editor, she is known for covering everything from travel and interiors to fashion and beauty. She regularly contributes to Livingetc, Ideal Home and Homes & Gardens, as well as titles like Prima and Red. Outside of work, her biggest loves are endless cups of tea, almond croissants, shopping for clothes she doesn’t need, and booking holidays she does.
-
 How to Thaw a Frozen Pipe — Learn Everything You Need to Know in 5 Minutes With This Guide
Winter storm caught you off guard? We asked an expert — just how do you thaw a frozen pipe?
By Hugh Metcalf Published
-
 The 12 Very Best Silk Bedding Pieces — As Our Style Editor Says: 'It's What Dreams Are Made Of!'
Slumber in lustrous luxury with the very best silk bedding sheets, duvets, pillowcases, and more — your sleep score will thank us later
By Julia Demer Published

